Want to take advantage of Xcode 7’s new test coverage reports but don’t know where to find them? Below is a step-by-step process for enabling and viewing test coverage reports in Xcode 7.
Enable Test Coverage
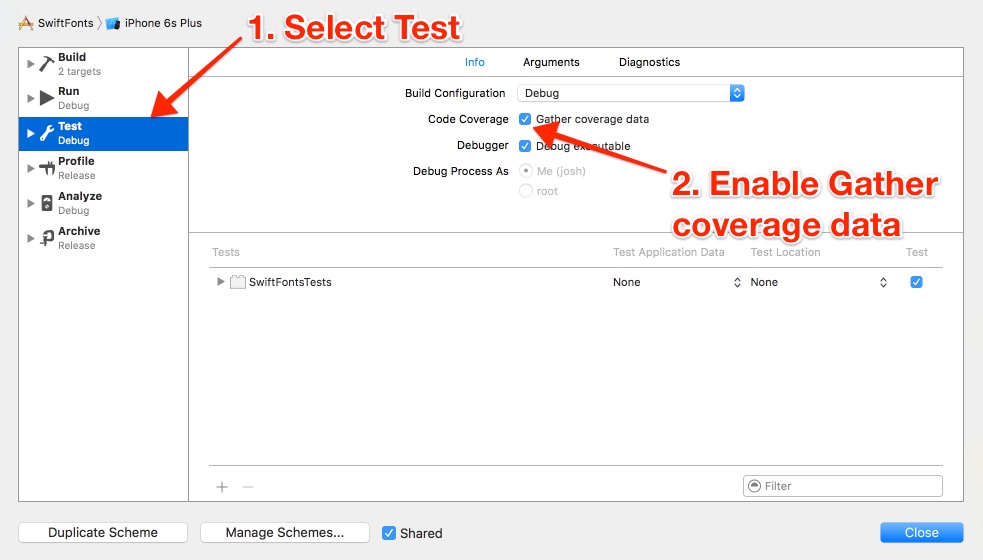
If you want to see code coverage reports, you need to enable test coverage data on your main target. You’ll need to edit the scheme, so go into the edit scheme dialog on your main target by clicking your target in the top bar, next to the Stop button, then selecting Edit Scheme…

Once you’re there, you just need to enable code coverage. To do that…
- Select Test on the left
- Enable the checkbox next to Code Coverage that says Gather coverage data
Congratulations! You have test coverage enabled! Be sure to run the tests for your app now that coverage is enabled, since coverage reports won’t show up for previous test runs.
View Coverage Reports
After you’ve run your tests with coverage enabled, you can look at your coverage reports to see which code in your main target was tested – and which code still needs to be. You can do that with the coverage reports that are built in to Xcode 7.
To view the coverage reports:
- Select the Report Navigator in the navigator pane on the left (⌘8)
- Select the latest Test run in the navigator pane
- Select the Coverage tab in the editor

From here, you can see how much of each class is tested, and you can sort by coverage to see which ones have the most or least.
Grab the code on GitHub if you want to poke around in the code and reports.
Not sure how to write tests? Read how to write unit tests in Swift and then watch a video to learn how to refactor using TDD in Swift.
Happy testing!
How should you start unit testing your app?
Unit testing for iOS can be lonely — most iOS developers don't seem to be doing it. Should you be writing unit tests? What are the benefits of unit testing, anyway? And if it is worth the effort, how do you get started? Enter your name and email in the boxes to get answers to your questions.