Convinced of the benefits of unit testing for iOS but not sure where to start? Trying to figure out what framework to use, how to set it up, and which test to write first can feel overwhelming.
What unit testing framework should you use? XCTest. Here’s why: it works well, it’s easy to set up, and it’s easy to use. You don’t need to waste your time considering all the pros and cons of every single testing framework out there.
So how do you set up XCTest? Luckily it’s super simple to since it’s built in to Xcode.
1.A. Adding unit tests to a new project
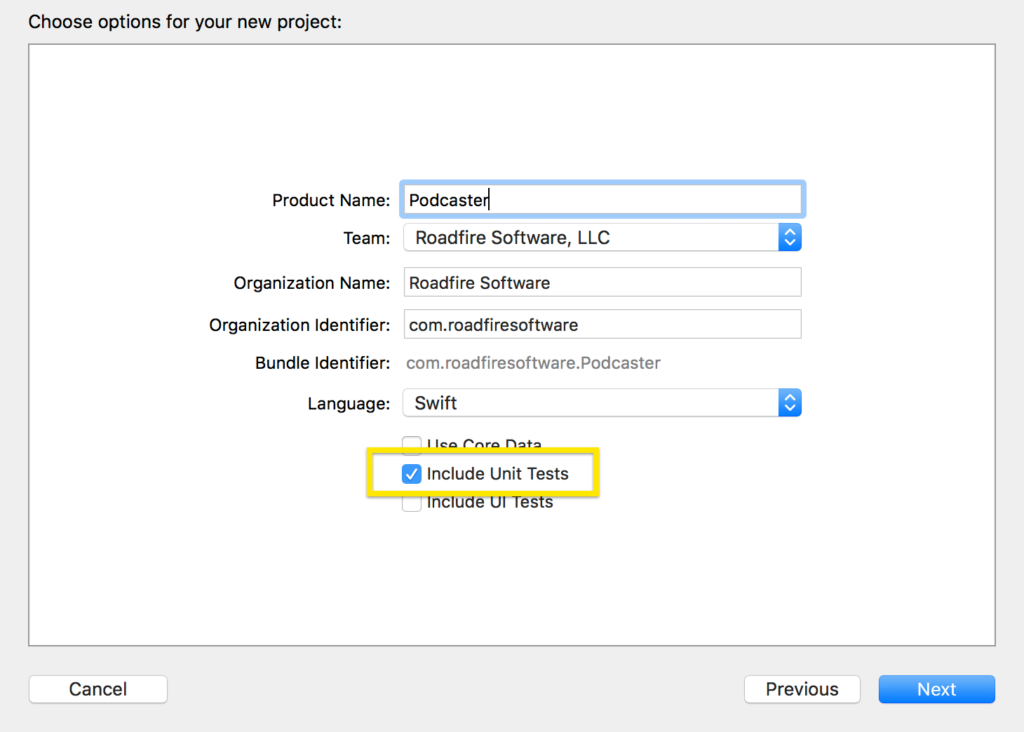
If you’re starting a new Xcode project, including unit tests is as easy as it gets — just check the box for Include Unit Tests in the New Project dialog.
1.B. Adding unit tests to an existing project
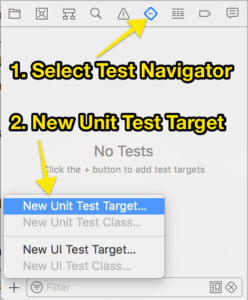
If you want to add unit tests to an existing Xcode project that doesn’t have any, it’s slightly more work since you can’t just check a box, but still pretty easy. You just need to add a unit test target to your app.
- Select the Test Navigator in the left pane (⌘6)
- Click the plus button at the bottom left and select New Unit Test Target…
- In the dialog that appears, click Finish. All the defaults are fine.
2. Running unit tests in Xcode
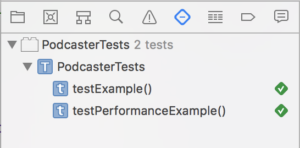
Now that you have the unit test target in your project, you can run the tests from the menu bar with Product > Test or just use the keyboard shortcut: ⌘U. Go ahead and do that just to make sure everything is in order. When the tests finish, you should see green checkmarks in the Test Navigator in the left pane (⌘6) indicating that the tests passed.
3. Writing your first unit test with XCTest
OK so you’re all set up to write tests. But what should you test?
In one word: requirements. Your unit tests should verify that your code meets the requirements for your app. You won’t be able to test all the requirements, but if you can test some of them, you’ll be able to quickly verify that your app meets those requirements. Or, when something breaks, you’ll know very quickly that your app no longer meets the requirements.
Let’s start by testing the following requirement:
The Login screen should have the title “Podcaster”.
For your app, I highly recommend picking a very simple requirement like this one (even if it’s not explicitly stated anywhere) and test that first.
Since you added unit tests to your project in Step 1 above, you should have a group called PodcasterTests that has a file called PodcasterTests.swift. Open that file in the editor.
You’ll see a bunch of completely unnecessary boilerplate methods and comments. Feel free to delete all of them, just leaving the imports and class definition.
import XCTest
@testable import Podcaster

class LoginTests: XCTestCase {

}
Note that we need to import the XCTest framework and have our class extend XCTestCase to run our tests in Xcode. We also import our app module — Podcaster, in this case — with the @testable attribute so we have special access to our app’s classes, properties, and methods.
Now let’s write a test for the title requirement:
func test_title_is_Podcaster() {
    let storyboard = UIStoryboard(name: "Main", bundle: nil)
    let login = storyboard.instantiateInitialViewController() as! LoginViewController
    let _ = login.view
    XCTAssertEqual("Podcaster", login.titleLabel!.text!)
}
Notice that our test function starts with the word test. This is required — in order for Xcode to find and run your test, you have to prefix it with test. The rest of the name is up to you; the underscores here are just my preferred naming convention for unit tests since I find them easier to read this way. (I’m all about camelCase for regular production code, though.) I want my unit tests to read like a sentence so when one fails I have a good idea of what happened based on the test name.
Inside the method, we get an instance of our LoginViewController by instantiating a storyboard and then the initial view controller — just like we do in production code. Then we force-cast with as! since this is a unit test and we want it to fail if the initial view controller isn’t a LoginViewController. I would never recommend doing this in production code but almost always recommend it for test code.
Next, we load the view with let _ = login.view. When the app is actually running, you never have to do this since it happens automatically. But we’re in a unit test here, so we need to ask the view controller for the view to make sure it’s loaded. Forgetting to do this can cause all sorts of problems: your view controller’s IBOutlets will be nil, and viewDidLoad will never get called.
And finally, we’re using an XCTest assertion to verify that text on titleLabel is “Podcaster”. XCTAssertEqual is just one of many options — you can find the others in the “Test Assertions” section of the XCTest documentation.
This may seem like a trivial test, but it does verify that our code meets the “title” requirement. And that’s what unit testing is all about: verifying, automatically, that our code meets the requirements.
You can run your test now with ⌘U or Product > Test; just be aware that it’ll fail if you don’t have a LoginViewController or if you don’t have its title label text set to “Podcaster”. For this tutorial, I’m going to assume you can implement the code you need to make the test pass.
This is fun. Let’s keep going!
4. Writing additional tests with XCTest
Testing the following requirement should look a lot like the previous test:
The username field should have the placeholder “Username or email”.
So here we’ll just want to verify that the username label’s placeholder is set to “Username or email”. Let’s do that:
func test_username_placeholder() {
    let storyboard = UIStoryboard(name: "Main", bundle: nil)
    let login = storyboard.instantiateInitialViewController() as! LoginViewController
    let _ = login.view
    XCTAssertEqual("Username or email", login.username!.placeholder!)
}
This test, like the previous one, creates an instance of LoginViewController, loads its view, and makes an assertion about it. This time the assertion is that the placeholder text on the username field is “Username or email”. And again we’re using exclamation points like crazy — but that’s fine since these are unit tests.
This gives us more confidence that our app meets the requirements — not all the requirements, but these two requirements. And if a bug is introduced where the placeholder is incorrect, our unit tests will catch it right away.
Conclusion
You may be wondering: why would I ever write such basic tests to verify such simple requirements?
Well…have you ever seen a typo in a text field placeholder before? Have you ever accidentally changed the text on a label you were just trying to move to a new position? Or has a new developer ever joined your team, decided he knows what’s best, and just changed things without asking?
Unit tests like these will catch typos and accidental changes. And they’ll catch that guy red-handed who thinks he can do whatever he wants. You’ll never be able to unit test every single requirement for your app, but having some automatic verification of requirements is much better than having none since they reduce the mental overhead of checking every. single. thing. in every. single. build.
What about more complex requirements, though? Our test suite would be much more useful if it could do more than just verify that a couple strings are correct. We can absolutely test more complex requirements. And we will. Next time. Don’t miss it — enter your name and email in the boxes below to build even more confidence in your code by testing behavior in your app.