Update: If you’re using Swift 4, check out the newer version of this article right here.
If you’ve done unit testing in Objective-C, you’re probably already familiar with XCTest. What’s nice about it is that when you run your tests in Xcode, you get:
- pretty red or green icons next to your failing or passing tests, respectively
- output in the test navigator, again with pretty red or green icons
- the ability to run a single test case
- the ability to run all the tests in a class
- a red line running across the editor when a test fails, showing you which assertion failed (sorta like a build error)
Did you know that you can get all of this by using XCTest with Swift, too? (Yeah, OK, you probably did…) But do you know how to use XCTest with Swift?
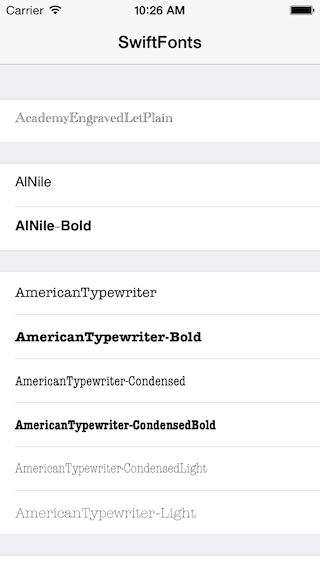
Here’s an example from SwiftFonts, an app that lists the fonts in iOS. Now, since iOS gives us the fonts, this is a pretty simple app. There’s only one problem: the fonts need to be ordered properly before we show them to a user! (like this…)
So…
I wrote a sort function in the view controller. It was decent, except for the fact that I accidentally wrote it to sort the fonts in each section in reverse alphabetical order (and didn’t even notice it)…
I did realize, however, that the ViewController was absolutely the wrong place to be sorting fonts (in fact, it’s absolutely the wrong place to do lots of things). So I decided to pull the sortFontNames function out into a class of its own. And when I did this, I thought, “hey, I could test that pretty easily now.” So I went ahead and wrote two tests using XCTest. And that’s when I discovered that I was sorting the fonts in a group in reverse alphabetical order (thank goodness for tests!).
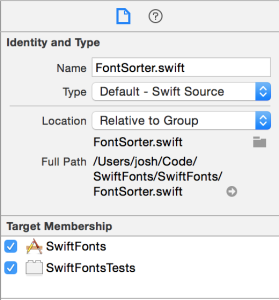
To test a Swift class with XCTest, you need to add that class to the test target. (Hopefully this is a temporary hack, but it’s been this way since Swift was in beta. I’m not holding my breath.) So, with your class selected and displayed in the editor, look at the Target Membership section in the File Inspector (the right pane) to make sure that both the app target and the test target are selected.
Here’s the first test, which ensures that any font names that don’t contain a hyphen come before any font names that do contain a hyphen. (A standard alphabetical sort doesn’t work in this case, so we have to write our own sort function.)
func testCompareHyphenWithNoHyphen() {
    let fonts = ["Arial-ItalicMT", "ArialMT"]
    let expected = ["ArialMT", "Arial-ItalicMT"]
    let sorted = sorter.sortFontNames(fonts)
    XCTAssertEqual(expected[0], sorted[0], "the array should be sorted properly")
    XCTAssertEqual(expected[1], sorted[1], "the array should be sorted properly")
}
Pretty simple, right? First, we create an unordered array of fonts. Then we set up our expected order. Next we ask our sorter to sort the fonts. And finally, we assert that the expected values are equal to the sorted array’s values from our sorter. And that String in the XCTAssertEqual is the message that’s printed if the test fails.
In the next test, I wanted to make sure that two font names that both contained hyphens were sorted alphabetically. So…
func testCompareHyphenWithHyphen() {
    let fonts = ["Avenir-Roman", "Avenir-Oblique"]
    let expected = ["Avenir-Oblique", "Avenir-Roman"]
    let sorted = sorter.sortFontNames(fonts)
    XCTAssertEqual(expected[0], sorted[0], "when two fonts contain a hyphen, they should be sorted alphabetically")
    XCTAssertEqual(expected[1], sorted[1], "when two fonts contain a hyphen, they should be sorted alphabetically")
}
Same idea as before, just with different font names this time. And if you’ve been wondering where that sorter came from, it’s just defined as an instance variable (instance constant?) at the top. Here’s the entire test class:
import XCTest
import SwiftFonts

class FontSorterTests: XCTestCase {

    let sorter = FontSorter()

    func testCompareHyphenWithNoHyphen() {
        let fonts = ["Arial-ItalicMT", "ArialMT"]
        let expected = ["ArialMT", "Arial-ItalicMT"]
        let sorted = sorter.sortFontNames(fonts)
        XCTAssertEqual(expected[0], sorted[0], "the array should be sorted properly")
        XCTAssertEqual(expected[1], sorted[1], "the array should be sorted properly")
    }

    func testCompareHyphenWithHyphen() {
        let fonts = ["Avenir-Roman", "Avenir-Oblique"]
        let expected = ["Avenir-Oblique", "Avenir-Roman"]
        let sorted = sorter.sortFontNames(fonts)
        XCTAssertEqual(expected[0], sorted[0], "when two fonts contain a hyphen, they should be sorted alphabetically")
        XCTAssertEqual(expected[1], sorted[1], "when two fonts contain a hyphen, they should be sorted alphabetically")
    }
}
All of the code for SwiftFonts is on GitHub (including these tests), in case you want to see the FontSorter or the ViewController.